


MK7 GTI RACE CAR BUILD

Onto the build

Weight loss time!


Roll-Cage


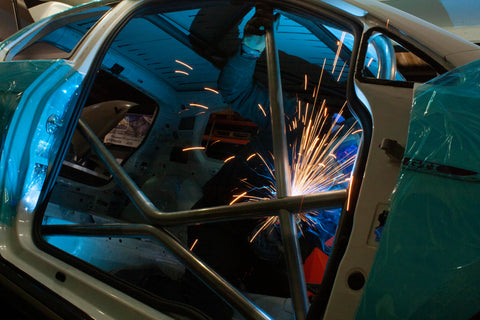


Now that we’ve got the cage all tacked in, we need to need to send off a video of the placement of the cage for the certification and to get the go ahead to begin welding it in place. While we wait, we’ll begin with all the other interior fabrication.
INTERIOR FABRICATION
While were waiting for the go ahead, we’ll begin doing some other fabrication in the interior of the car. There’s plenty to do! here’s a list of everything:
Steering rack- For this, we cut apart the steering rack/steering wheel mount from the existing OEM dash bar. We then began to weld it onto the new dash bar which was now part of the roll cage. Luke then fabricated some caps for each end to neaten it up then primed it.


Seat mounts- As we’ve cut out the original seat mounts, we now need to fabricate some new ones for our FIA spec bucket seat. For comfort reasons, we needed get the seat as centred to the pedals and steering wheel as possible. This meant that Luke had to cut into the exhaust tunnel and then fabricate some plates to patch it back up, in order to mount the seat rails another couple of inches to the left. The rails were then fabricated on either side so they can be easily removed if needed.


Foot plate- A foot plate was then cut to shape, bent and welded into place.

Fire extinguisher- Mounts for a fire extinguisher were then fabricated and welded into the passenger footwell.
Rear seat-belt mount holes- We then also chose to fabricate some plates to cover up the rear seat-belt mount wholes, just to tidy things up. 


We’ve also received and test fitted a circuit pro Sparco bucket seat and a Sabelt Monaco steering wheel.
This was also a good time to cut and test fit the dash so it’s ready for later.


With all that now complete and the go ahead from the cage company, it’s now time to go ahead and start permanently welding in the cage.

INTERIOR PAINT
Now with all of the interior fabrication and welding done, its now time o begin paint prep. The whole interior was first scuffed up with scuffing pads, then cleaned thoroughly using a hoover and pressurised air. The car was then masked up precisely to avoid any overspray before being moved to the spray booth and wiped over one last time. Luke can now begin laying down a coat of primer followed by a couple layers of Nardo grey. It came out great!


INTERIOR RE-INSTALLATION
Once the paint had completely dried, we could now begin re-fitting all of the interior parts. We began drilling holes, fabricating brackets and routing cables on the freshly painted interior of our mk7 GTi, and it’s looking great! There was plenty of bits and bobs to get on with, such as:
-stripping the interior wiring harness of any unneeded wires and re-wrapping it with motorsport sheathing.
-Refitting the dash and wired in buttons for the extinguisher and shutoff.
-Installing a lifeline extinguisher system with cables routing to both the interior and engine bay.
-Installing a battery cage with a circuit cut off and a battery isolator switch.
-Fitting a radio for pit to driver communication
-Refitting the auto handbrake and window switches with a nice bracket fixed to the centre.
-Installing our Sparco bucket seat and steering wheel.


WHEELS AND BRAKING
We chose to use 2Forge wheels wrapped in Toyo R888R tyres for the wheel set up. These are big enough to fit the RS3/TTRS brake set up. This includes Bigger Brembo callipers with a larger rotor set up. We chose to use EBC racing pads and DBA disks.


SUSPENSION
Luke’s installed AST 5100 adjustable coil-overs all round. These are the same we use on all our mk5’s and never disappoint with accurate adjustment and damping options. These have been installed as a baseline in order for us to further develop them with AST Suspension so that we have a track orientated kit to sell and fit to customers cars.
He’s also dropped both the front and rear subframes to install a super pro ‘handling package’ which consists of bushes, anti-roll bars and alloy wishbones.
The underside and components have also been given a good clean to keep everything looking tidy!
Finished off with one of Luke's corner weighting and 4 wheel alignment race set up's.


GRAPHICS
Now that the majority of the build is finished, its time to get it over to Micky at MKS customs for our wrap to go on the car! We have been designing the wrap with MKS for some time now and were extremely happy with the final design. Here is the finished product!


